Saturday 31 March 2012

Style Guide: Six Essential Festival Finds


I don't know about you blogettes, but atm festivals are definitely on my mind, now that spring has officially loomed! Period.
Between the warm weather, awesome tunes and (most importantly) the style spotting, I'm counting down the days until I can begin the festival hunting!!

Whether you’re attending CoachellaLollapaloozaBonnaroo or Mile High Music Fest, here are six stylish essentials that will keep you chic and happy this festival season:

festival fashion
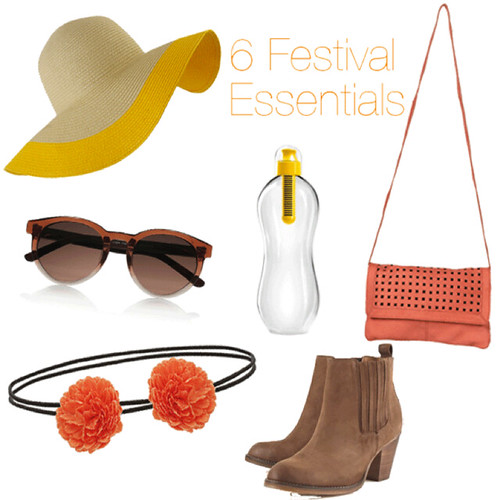
  1. The floppy hat. Wrinkles don’t look good on anyone. Protect your beautiful skin and keep it chic with a floppy hat like this yellow trimmed option.
  2. Stylish sunnies. One of the biggest perks of daytime parties? Wearing your favourite sunglasses! These round-frame glasses by The Row have a subdued, retro vibe that I love.
  3. Haute headbands. Unfortunately, high temps mean there’s a high chance you’ll be sweating (I prefer the term “glistening”). Combat excess glimmer by keeping your hair off your face with a cute headband like this coral flower headband by Dorothy Perkins. 
  4. H2O. It’s important to hit the (water) bottle as much as possible when you’re hanging in the sun all day. This cute Bobble bottle is the perfect way to stay hydrated in style. 
  5. Booties. I am not one to advocate practicality that often, but comfortable footwear at festivals is seriously necessary. No ifs, ands or buts about it. Keep the sludge off your toes with booties, like this versatile pair
  6. Crossbody bag. You’ll need full dancing abilities so don’t even think about lugging a cumbersome shoulder bag around the festival grounds. A crossbody bag or backpack is a must. If you ask me, I like this coral crossbody from Topshop.
What’s your number one festival (or spring) must-have?

Are you going to any music festivals in the near future?

Saskia XO

Thursday 29 March 2012

Colour Clash


Ladies! I can’t get enough of this makeup combination and am dying for you to try it! Normally I would pair purple eyeshadow with nude, pink or peach lips for a very feminine and Spring look (which we should never give up), but you will be surprised how gorgeous purple lids also are with a red lip! It makes such a modern statement that has confidence written all over it, making it a must try this weekend. Here’s how:

PURPLE LID
The standard cult favourite of makeup artists is THIS LILAC SKY PALETTE from Yves Saint Laurent because it has the five most perfect purple shades you will ever find. Period.
HINT: Try a lavender liner like this Urban Decay 24/7 gorgeousness in Morphine or a shimmery powder wash of colour with Urban Decay Stardust in 54.
MODEST: Do a single colour wash all over the lid but go a little heavier handed with a waterproof cream formula. Makeup Forever Aqua Cream in #18 Purple is heaven. I literally die whenever I use it on someone.
EXTREME: I actually did the makeup in the extreme shot above on the lovely actress Analeigh Tipton (Crazy, Stupid, Love. and the upcoming Damsels in Distress) for a fashion feature in this month’s issue of Flaunt magazine. First I drew and filled in the winged shape with Sephora Collection Jumbo 12-Hour Liner in Violet then swept this NARS Single Shadow over it.
RED LIP
MATTE: All purple shades pair perfectly with NARS Pure Matte Lipstick in Vesuvio.
SATIN: If you like a little more shine to your lipstick, pair it with the classic of all red lipsticks, Dior Rouge Lip Colour in Ara Red.


Will you follow 'colour clashing'?

Saskia XO

Wednesday 28 March 2012

In the Bag: Prepped & Ready

In the Bag
Spring is here and so are fairs, festivals, flea markets & fiestas! As silly as it may sound, I always keep a bag ready to go by the door for an impromptu day of fun-in-the-sun.

The Essentials
  • sunglasses
  • a big floppy hat
  • sunscreen, spf 30 or higher
  • tinted lip balm
  • a camera
  • a pretty vintage blanket
  • a good book

What essentials would your go-to-bag contain?

Saskia XO

Tuesday 27 March 2012

Simply Lovely: Wedding Beauty

Wedding Beauty

After this past weekend, everyone seems to have weddings on the brain. I, myself, spent the weekend in beautiful Heartsford Manner, Surrey, attending one of my best friend's mum's wedding. In a tranquil homely atmosphere; just as lovely. So I thought I’d write a quick note on my thoughts regarding wedding
glam.
When attending a wedding, subtle is always best. Think soft, pretty or romantic instead of sultry, edgy or drastic. The bottom line is weddings are about one girl and one girl only. She’s the one wearing white… and possibly something blue. It’s her day to shine so save that statement-making look you’ve been dying to try for another event. When choosing a hair style, opt for something simple and classic. Maybe soft curls or a smooth up-do. Keep makeup clean with a neutral palette. Every wedding is different, but whether it is a grand black tie event or a backyard BBQ, keep wedding hair and makeup polished and pretty.

Speaking of weddings, what's your dream dress look like?

Saskia XO

Mani Monday!


photos and posts by Kristin Ess

Let’s discuss the “accent nail”. It’s fun (and a lot easier) to do nail art on just one nail, but it can be hard to come up with a pattern idea. Here’s a suggestion: take a peek in your closet! Look at your favourite shirts, skirts and dresses for inspiration. When our recent STYLEMINT tops came in the mail and we opened the box, we noticed the patterns and colours were perfection. Doing every nail can be a bit much so we took the pretty patterns and came up with some custom accent nail looks. Here we go…
RED POLKA DOT MANI INSPIRED BY THE CHARLTON T:
  • Paint the whole nail white. Once it dries completely (I suggest leaving it to dry over night), use scotch tape to section off diagonally. Paint the side closest to the tip of your finger with a rich red.
  • Dip your dotting tool in red polish.
  • Dot the white using the red polish.
Note: You can also use the white polish to make dots on the red if you want to go opposite.
MULTI-STRIPE INSPIRED BY THE MADISON T:
  • Gather some different sized art brushes. They often come in packs or you can gather old makeup brushes that you don’t use anymore.
  • Paint the base of the nail white then make some small polish puddles with the colours in your shirt.
  • Use scoth tape to section off different stripes. If you’re really good, you can probably freehand, otherwise use tape! Dip different brushes and drag across the nail to make various sized stripes!
FINE STRIPE INSPIRED BY THE ARDEN PULLOVER:
  • Paint the base of your nail blue.
  • Dip a nail striping brush in white polish.
  • Lightly drag across the surface of the nail.
Which set of nails are your favourite?
Happy Working!


Saskia XO

Saturday 24 March 2012

Kitchen Beautician: DIY Lemon Scrub

Lemons


It’s official. Spring has arrived. That means it’s time to shed those layers and show some skin. Unfortunately, our limbs have been hiding all winter long and may not be looking their prettiest. To bring dull skin back to life, try this refreshing body scrub. Here is an easy recipe for a salt scrub that you can make with ingredients found in your own kitchen. You’re just moments away from shiny new skin.

What you will need
  • 5 tablespoons sea salt
  • 1 tablespoon olive oil
  • 1 lemon

Instructions

First mix the olive oil and sea salt together. Once the salt gets coated by the oil, the lemon won’t dissolve it! Next cut the lemon in half and squeeze over the salt + oil. Mix and mash. (Feel free to adjust the recipe to your liking.) Then scrub away!!


What other fruits could you incorporate into a rejuvinating body scrub?

Saskia XO

Thursday 22 March 2012

Recipe for a Splendid Spring...


lace shorts
Yesterday was the first day of Spring! Also known as the Spring Equinox. Spring is easily my favourite season—all the flowers are blooming, baby animals are being born, the weather is beginning to warm up… As someone once said, “Spring is nature’s way of saying, ‘Let’s party!’” Yes!


Last year, many blogettes posted blogs about their key pieces for a perfect spring wardrobe, so this year I thought it would be fun to share all of the things that make for an ideal spring in my mind.


Without further ado, here is my recipe for a Splendid Spring...


1 cup of collecting wildflowers


3 tablespoons of music festivals {I suggest Coachella}


A dash of Sweet Peep Sushi


2 handfuls of my SPRINGredients


2 teaspoon of spring favourites {these are great too}


1 stick of 30+ SPF


A splash of adventure


A sprinkle morning hikes


1 heaping scoop of laughter {this is a great substitute too}


Instructions: Mix all ingredients together over a 3-month run and enjoy!


What are you hoping to do this spring? Make your list in the comments below…or better yet, your recipe!

Saskia XO

Wednesday 21 March 2012

Beauty Note: Sunlessly Sun Kissed


Sunless Tanning
Tonight I am off for my first spray tan of the season...no I do not always get them, however it is in honour of an event I have been invited to attend: My best friend's mum's wedding (awww!) So with this in mind, my 'Sunlessly Sun Kissed' blog post was formed.....

Tanning is so old school. These days we ladies know better than to coat our skin in oil and bake all day in the sunshine. No thank you! I love a good glow, but I’ll opt for a self-tanner and skip the premature aging and skin damage please. Unfortunately there are many lessons to be learned when it comes to self-tanners. Self-tanning mishaps are embarrassing, but they happen to the best of us. Streaky application and orange palms are just a few of the easy-to-spot giveaways that you’ve been (shhh!) faking it.


So here are a few tips on how to look sun kissed without the sun…


{PREP}
  • One of the most important steps for self-tanning is to exfoliate your skin.  Before you get started, hop into the shower and give your skin a good scrub.
  • Also, avoid shaving immediately before (or after) applying self tanner.
  • When your skin is nice and clean, towel off and make sure you are completely dry. Once you’re dry, apply a barrier ointment (Vaseline, Aquaphor, Bag Balm…) onto your fingernails, toenails and cuticles to avoid discolouration.


{APPLICATION}
  • Every self-tanner is different and they come in all different forms (gels, foams, lotions, sprays, towelettes… just to name a few). Your application strategy will depend on which one you choose to use. Sprays are pretty simple. They can be done over an old towel and dry fairly quickly. When applying gels, lotions or foams, one of the biggest mistakes that people make is getting it on their palms. This just looks unnatural and a little weird to say the least. You can avoid this by cleaning you hands immediately after applying the self-tanner.
  • Using a nailbrush and soap, scrub your palms to make sure none of the tanner remains. This strategy comes with some risk though and might not be 100% effective. If you don’t want to use your bare hand you can always slip on a pair of disposable latex gloves to protect them. Another way to avoid orange palms is to simply not use your hands. Instead, use a sponge paintbrush (you can buy these at hardware stores). Try to get one that is 3 inches wide for effective coverage.
  • Before you get started, always test a small amount of self-tanner on your skin. The same tanner can react differently on two separate people, so always try a test spot the day before to make sure you won’t end up looking like an oompa loompa.
  • When you are ready to apply begin at your feet and work your way up to avoid creasing the colour by bending over.
  • Once your entire body (with the exception of your palms and the bottom of your feet) has an even coat of self-tanner on it, apply a layer of lotion around your wrists, ankles, elbows, the backs of your knees and underarms. Basically you are slightly diluting the colour in these areas that naturally appear lighter on your body. This will make your tan appear most realistic.


{AFTER}
  • Wait at least ten minutes before putting any clothes on and when you do get dressed wear something dark to avoid stains.
  • I personally prefer to use self-tanners in the evening because I don’t like the scent or the feel of them on my skin. That way I can tan before bed and wake to a shower and bronzed skin.


{A NOTE TO THE WEARY}
If all this just sounds a little to scary for you then try a gradual tanning lotion. They take longer to show results, but they are effective with a lower risk of streaking and orange palms. Many of you recommend Jergens Natural Glowas your favourite gradual sunless tanner, so if you haven't already, give it a try and let me know what you think!


{DAMAGE CONTROL}
Oh no! Something has gone wrong. Your colour is uneven, too dark or too orange. There are a couple tricks to shortening the lifespan of your less-than-perfect paint job. One is to take a dip in a pool! The chlorine will help to fade your tan. Another option is to use a scrub in the shower for the next couple of days. And if all else fails… wear long sleeves and pants. It’s not ideal, but it works.


Personally, my favourite sunless tanner is Kate Somerville Somerville360 Tanning Towelettes. But I have also used Dior Self-Tanner too.


Do you have any extra tips or tricks for applying self-tanner? Wish me luck with mine tonight!
Saskia XO

SPRINGredients!

Since today IS the first day of spring, it is ever apparent that spring has sprung, these are a few of my favourite seasonal spring ingredients… along with a link to a delicious recipes for each one.

1. Asparagus { recipe: oven roasted asparagus }
Asparagus

2. Fava Beans { recipe: rigatoni with fava beans and pecorino }

italian dish

3. Grapefruit { recipe: grapefruit salad }

grapefruit

4. Peas { recipe: crushed peas with smoky sesame dressing }

Peas

5. Apricots { recipe: apricot fig compote }

Apricots

6. Arugula { recipe: grilled cheese sandwich with garlic confit and baby arugula }

Grilled Cheese

7. Beets { recipe: golden beet salad }

Beet Salad

8. Mint { recipe: mint lemonade }

Mint


9. Rhubarb { recipe: strawberry rhubarb pie }

Rhubarb Pie


Just looking at all this food makes me hungry!
Do you have any recipes that include these seasonal ingredients? If you do, please share them in the comments below!


Saskia XO

Tuesday 20 March 2012

Incorporating the White Blazer into Spring!


In anticipation of warmer weather to come, it can be exected that as fashionistas (yes ;)) we should now begin the process to replace our heavy Winter-wear with a refreshing batch of bright prints and lighter hues. That said, one of my biggest swaps is trading out a black blazer for a white one.
Designers like Stella McCartney and Phillip Lim showed them on their Spring runways and I guarantee that you can not wait to get on board with the trend, right?! Yes, it might be a little jarring to store away your tried and true black blazer, but believe me when I say you won't regret it. To prove that point, I'm showing you five different ways to wear this gorgeous American IRO Alessia Brushed-Crepe Blazer ($475). You can always find a more affordable option, but I love this particular one for its slight ivory hue and perfectly tailored shape. Ready to make the swap? Just scroll down to see and shop five fun ways to wear a white blazer for Spring.

White Blazer + Dress...
Pair a white blazer with a whimsical Spring dress for an effortlessly pulled-together outfit. Finish off the look with an extra coating of mascara, a dab of pink lipstick, and you're set for a night out on the town.
white blazerIRO Silk Crepe Blazer, Zara Buckle Sandals ($90), Rebecca Taylor Printed Henley Dress ($395)


White Blazer + Jumpsuit...
Instead of the usual LBD, try out a blazer and jumpsuit for your next black-tie party. The black-and-white contrast demands attention, and you have got to love the look paired with dainty sandals and a standout pendant necklace!!
white blazerIRO Silk Crepe Blazer, Ann Taylor Jackie Bow Sandals ($198), Tibi Wrap Jumpsuit ($525), Vince Camuto Natural Horn Pendant Necklace ($58)


White Blazer + Leather Shorts...
This one's for the experimentalist. Pair a white blazer with a striped tee, leather shorts, and statement flatforms for tough-meets-girlie ensemble.
white blazerIRO Silk Crepe Blazer, J.Crew Colorblock Stripe Tee ($45), Alice by Temperley Laser-Cut Leather Shorts ($595), ASOS Viper Flatform Sandals ($90)


White Blazer + Ladylike Pastels...
A white blazer looks amazing paired with pastels. Style this one with a light skirt, lemon-yellow sweatshirt, and tough accessories for a cunning ladylike look.
white blazerIRO Silk Crepe Blazer, Helene Berman Lace Pencil Skirt ($85), Topshop Roll Sweatshirt ($44), Eddie Borgo Stud Earrings ($240), Christian Louboutin Lady Max 100 Spike Leather Sandals ($1,495)


White Blazer + Jeans...
A blazer can instantly add polish to a pair of jeans. Create a casual, yet sharp look with a white blazer, flared jeans, a flowy silk top, and pointy-toe pumps. Perfect for a casual work environment or your next lunch date.
white blazer
IRO Silk Crepe Blazer, Topshop Pointed Pumps ($96), Marc by Marc Jacobs Standard Supply '70s Flare Jeans ($228), Leifsdottir Klara Asymmetric Buttondown Blouse ($98)


Which look is your favourite?


Saskia XO

Monday 19 March 2012

Mani Monday!


If you’re a fan of pretty shiny things, you’re going to love my first spring mani of the season!
We all know everything looks better dipped in gold, so I thought this should do the trick. I decided to use gold leafing sheets to accent the corners of these turquoise nails.

Here’s how you do it:
TOOLS: Turquoise nail polish, gold leafing sheets (available at your local art supply stores or see link below), clear top coat, nail file, q-tip (regular or pointed).
STEPS:
  1. Select a good turquoise polish. I used this one, but to be honest you can use any colour that you think goes well with gold. (It’s really pretty with white + coral!)
  2. Paint all of your nails with the base colour you choose.
  3. Gold leaf sheets (I used these) are VERY delicate so make sure your hands are clean + dry before handling. They tear so easily! Use scissors to cut small triangle shapes that will fit the corners of your nails. You want to cover about 1/3 of your nail, so make your triangles about that size.
  4. Wet a q-tip and use that to pick up your gold triangle. Don’t try to pick them up with your fingers– you’ll crumble them and that’s a bummer!
  5. Lay the gold leaf triangle on the corner of the nail. You want to work quickly so the leafing sticks to the polish. The polish should be dry but still slightly tacky. If it’s too dry, put a very thin layer of clear top coat down before laying the leaf on the nail.
  6. Smooth over the gold leaf with a clean dry q-tip to remove wrinkles/bubbles. If you mess up and chip off a piece of gold, it’s totally fine! Gold leafing is so thin that you can just lay another piece over the messed up part and it blends right in.
  7. Use a nail file to gently file off the excess just like you would with nail stickers!
  8. Finish with a quick drying clear coat to lock the gold leafing down!

Enjoy!

Happy Working!

Saskia XO

Friday 16 March 2012

Friday Favourites!

Yes my gorgeous blogettes....it is that time of the week again! So sit back, relax and enjoy the inspiration from my past week!!!


Favourite Pile:

6869134489_4d800f6840_b_large


Favourite Store:

Tumblr_m0z0veha5p1qk2mvko1_500_large


Favourite Combo:

Tumblr_lzjzt1ys801qepccoo1_1280_large


Favourite Quote and Rule to Live by:

Tumblr_l00v3yytkd1qazj2jo1_500_large


Favourite Message Reieved When Reading a Novel:

Book-origami-by-isaak-salazar-5073_large


Favourite Past Time Obsession:

X_733395bc_large


Happy Friday!

What have you ben inspired by over the past week?

Saskia X

Monday 12 March 2012

Style File: Fashion Abroad

fashion abroad

Following from all the many flamboyant events that the fashion industry indulgies in but 1000 times a year, trends got me thinking MIA....especially how some trends transcend international borders, while others are self contained.

Here in London, UK, bold colours, head-to-toe pastels, stripes, and ladylike silhouettes are on the forefront of fashion.

What are the major trends in your country or hometown?

So to kick of this new week on a foremost fashion foot....snap a photo of an outfit that exemplifies your local trends and upload/submit it to this post (bellow! )
I am forever intregued and can’t wait to see your photos!

Happy Working!

Saskia XO

Friday 9 March 2012

Friday Favourites!


Happy Friday everyone! Can you believe that we are already more than a week into March? Time flies doesn’t it? Anyway, these are a few of my favourite things from the past week. Let me know what you think about them in the comments below…


Favourite Trick:

friday favorites


Favourite Way to Recall a Memory:

Tumblr_m0mg6zgo0m1qixlvbo1_500_large


Favourite Laugh:

friday favorites


Favourite Quote:


friday favorites
Favourite Hair Style:


4691519928_5891f03c62_large


Favourite Thought:


765234 by ~pomidorova on deviantART


Have an amazing weekend!

Saskia XO

Thursday 8 March 2012

The Beauty Department's First Bday!


Can you believe that the one, the only www.thebeautydepartment.com is about to celebrate their very first birthday?! It's unimaginally crazy that the website, which has had so much success has only been open to viewers for merely 365 days :O


So in honour of turning the big OH ONE, they really wanted to figure out a way to celebrate with us lovelies since we’ve made TBD feel like such a success ;) As their audience is so vast with languages also, this is what they came up with:


" On April 19th (their birthday) we’re going to select 5 winners at random who will be invited + scheduled in for a DAY OF VIRTUAL BEAUTY SCHOOL with us via Skype! We’re going to put you and + a friend of your choice through hair, makeup + manicure class with us! This will be your chance to learn, ask questions, discuss your hair/makeup/skin issues, and hopefully learn to conquer any beauty battles you might have. Got a pretty picture of a hairstyle you’ve always wanted to learn? That can be covered too! "

YES! Your eyes have not decieved you....

 Here’s how you enter:
  1. Follow TBD on Twitter or Like TBD on Facebook
  2. Email them four things: your name, your friend’s name, a valid return email address, and your physical address for verification purposes. Send your entry to CC@thebeautydepartment.com
  3. And....cross your fingers!
It is reported that once their randommly selected winners are chosen and verified (as either TBD facebook fans or twitter followers), they will be contacted via email, asked to download Skype for free, and scheduled in for a class.


Good luck friends! I can’t wait to see who wins!! Let the battlet begin.......NOW!


P.S. For complete contest rules and regulations, click HERE!


Saskia XO

Sunday 4 March 2012

What Really goes on behind the scenes at Fashion Weeks?


A couple weeks ago, Team LC.com took to the streets of NYC for the nation’s biggest fashion extravaganza: New York Fashion Week! Their mission? Spot the best trends in fashion and beauty for Fall 2012 to share with all of us. But, before I show you what styles will be making a splash come fall (we haven’t even hit spring yet people!), I thought it would be fun to show you what happens behind the runway first… Here’s a photo recap leading up to the Hervé Léger by Max Azria fall 2012 ready-to-wear show. (Fun fact: Max Azria is the same brilliant designer behind BCBG!) I hope you like it!


The day before the big runway show, the designer rounds up a few models and their beauty pros to figure out the perfect hair and makeup to accompany the clothing. This is called a “hair and makeup test.”
NYFW
I can imagine my jaw subconsciously dropping if I had the honour to arrive to the sights of this. The room was filled with statuesque models, an endless sea of beauty products and hair tools as far as the eye could see. Heaven!
NYFW
Brushes, brushes and more brushes!
NYFW
During the makeup test, pros try out different hairstyles and makeup looks on a few models. Once a “test look” is complete, the designer comes in and inspects. They either give it the green light or they ask to see more options.
nyfw
Keep in mind, the hair and makeup that’s agreed upon has to be worn by every model that has been cast to walk in the show. So “the look” has to be versatile.
nyfw
Each time the pros finish another hair and makeup look, the model goes into “styling” where the designer checks to see if the hair and makeup work with the clothes. (As you can see, no cameras allowed!)
nyfw
Finally, a hair and makeup look is selected…and I totally love it! The bold brows, barely-there makeup and blunt ponytail look stunning:
nyfw
And you guys know that I am undoubtedly, a big fan of the fresh-face. It's bang on trend plus transforms the natural face to existing wonders! (look here at LC.com…) 
nyfw
The next day, it’s time for the show. Before the models hit the runway, they head backstage to get made up and dressed. When the stylists arrived, backstage was buzzing with blow dryers and flat irons while makeup artists worked meticulously on each face. Basically, it must have been fashion mayhem!
nyfw
And you’d be surprised what you find backstage…such as tables full of hair extensions:
nyfw
And shoes:
nyfw
And plenty of ammo for emergencies (I love the “back up” harness, don’t you?):
nyfw
Finally, once the models are in full hair and makeup, they get dressed and hit the runway!


The final product? Perfection.
nyfw
Did you check out any of the fall 2012 shows? If so, which one was your favourite?


Saskia XO