Sunday, 15 January 2012

Inspired Idea: Bows, bows, bows!


Bows!

Happy Sunday morning bloggers of the vast blogger universe! Today's post is a layed back affair of a girly adornment to reflect this relaxing day.....
Bows, bows, bows!! This week I am obsessed with the style staple that is undoubtedly...bowes!

Celebrities such as Lauren Conrad have been spending some time in 'The Big Apple' (aka New York City) to work on her clothing line LC Lauren Conrad for Kohl's. The season that she is currently working on is filled with my favorite pretty detail… Bows! After spending a week surrounded by beautifully knotted ribbons and chiffons, I simply can’t help but be inspired. So if you are a bow lover like myself, why not let that trend carry over into The Beauty Department? Nails, hair and even lashes are all just waiting to be adorned with a lovely bow.
What's your favourite way to work a bow into your look? 
Saskia XO

Saturday, 14 January 2012

Party Sequins: A Bottled Affair


bottles
Party planning is a lot like designing a party dress. Like a dress, a party must be made with the appropriate materials (menu, location, guest list), tailored to the occasion (theme) and topped off with the perfect finishing touches. I call these finishing touches, "party sequins." Like a sequin, thoughtful decoration details add an unexpected luster to an otherwise ordinary event.

My mum recently stumbled upon a charming party sequin idea. The idea is as simple as it is lovely: hanging glass bottles with flowers in them from twine as party décor. I instantly fell in love with this since I have an annual Derby Day party and always try to incorporate creative details like this into the décor, I thought of sharing it with my trusted blogees!

Putting these pretty hanging bottles together is very simple…

Here's what you will need...
  • twine
  • vintage glass bottles (you can pick these up at your local flea market)
  • fresh cut flowersbottles2
  • scissors

Instructions
  1. Measure and cut twine according to the height of the area you will be hanging the bottles from. I think hanging them at or slightly below eye level is most effective. Make sure you leave a little extra slack, about 8 inches on each end, for tying. 
  2. Tie one end of the twine onto the neck of the bottle.
  3. Fill the bottle with as much water as you like. I think it looks best when you vary the amount from bottle to bottle…  
  4. Cut and place your flower into the bottle. I love the idea of mixing different types of flowers, but keeping them all the same colour. 
  5. Hang the flowered bottles from a sturdy beam or slat. 

Whether you’re planning a big party or a simple brunch, these hanging bottles will add the perfect touch of pretty to any event. 

Are you going to give this party sequin idea a try? Or if you have a creative party sequin idea, please share it in the comments below!
Saskia XO

Friday, 13 January 2012

Friday Favourites!


I hope everyone’s 2012 is off to a great start! I finally feel like I can get caught up on things now that the holidays are over and January is in full swing. Between traveling, spending time with family and school work, it’s hard to find a moment for myself. Needless to say, I’m planning on having a quiet and relaxing weekend. Without further ado, here are my favourites from this past week… Enjoy!

Favorite Fairytale Photograph

Friday Favorites


Favourite Giggle

Girlscene - Notebook Inspiration - Crea Bea


Favourite Admirers

Instagram


Favourite Friday Appitiser

My Paradise.


Favourite Feeling

*-* far away lovers *-*: Ein Hauch von Sommer


Favourite Memory

beach, black and white, blackandwhite, boy, chiara ferragni - inspiring picture on Favim.com

Happy Friday! Have an amazing weekend!

Saskia XO

Thursday, 12 January 2012

Vogue: Trend Report


AUTUMN/WINTER 2011-12 was all about the razzle-dazzle, but it's time to trade in sequins and sparkle for a subtler radiance.

Glistening silk organzas and high-tech fabrics with a luminous glow are the new way to shine for spring after lighting up the catwalks at Chanel, Christopher Kane and Marc Jacobs.

Less about the glitz, silhouettes remain clean and classic - see Kane's shift dresses - while wet-look sheen brought moden glamour to full-length gowns at Marios Schwab and Giles.


Chanel


        So the new trend: subtle glamour inspired by shimmer and sheen!

        Will you be a part of the trend?

        You heard it here first!

        Saskia XO

        Prim and Proper: The Classic French Manicure


        There’s something really regenerating about taking a break from nail polish for a second, right? There are so many fun and funky nail trends today that it makes you want to change things up… a lot!
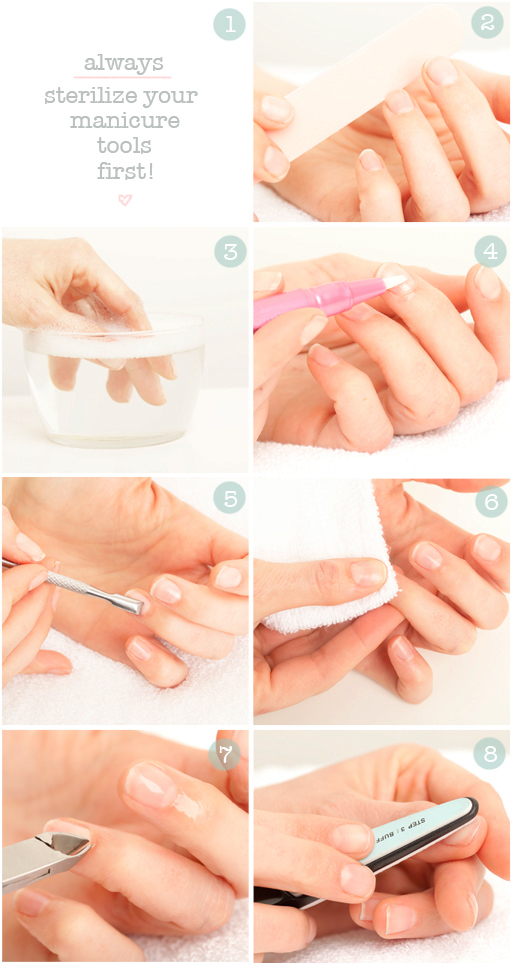
        In this tutorial, I will show you how to give yourself a perfectly polished, natural manicure that looks lovely and allows your nails to breathe a la beauty department!

        · Always clean your tools properly before you begin. You can simply wipe them down with alcohol and a cotton ball,  for proper sterilisation I placed my metal tools on a cookie sheet (make sure they don’t have plastic on them) and baked them at 375 for 15 minutes. Make sure to let them cool off completely before using.
        · You want to file your nails dry. Filing wet nails can cause splitting or peeling. Not cute!
        · Soak your nails in a bowl of warm water. Add a little bath salt or Epsom salt to your water for softening. Or add liquid soap for cleansing. I added 5 chamomile oil drops as well to soothe an moisturise.
        · Next apply a cuticle oil or cream to keep the cuticle soft while you’re doing your manicure.
        · Using an orange stick or a metal pusher as seen above, push your cuticles back. Apply light pressure and don’t be too aggressive.
        · If you don’t have an orange stick or metal pusher, you can push the cuticle back with a hand towel.
        · If you’re a pro, you can very carefully trim the cuticle. It’s best to leave this step to a manicurist, but if you want to do it yourself at home, make sure you know what you’re doing! It can be very painful if you cut yourself.
        · Lastly, buff the nail using a 3 or 4 sided buffer. The shine from buffing is AMAZING!! It’s better than any top coat you could ever apply. Buffing takes patience, but it’s so pretty once it’s done. Don’t forget to buff the edges of the nail where you filed! This will keep it from snagging.

        Will you ditch the funky nail prints for one classic tone?

        Saskia XO

        Tuesday, 10 January 2012

        Currently Craving: Perfect Paris...

        Having been surrounded by a bondbardment of the chic culture, as I study French and my textiles project is based around the theme of French Parisian, I couldn't help but be sucked into the plughole that is 'Perfect Parris'. The results= I have been craving all things vintagely French inspired!

        With designers such as Chanel, Jean Paul Gaultier, Christian Dior and Yves Saint Laurent not to, of course forget, the phenominom that is Christian Louboutin...the fashion side of Paris particularly engulfed my presence and has lead me furthermore influenced....

        So feast your eyes upon some of my inspiration for the rest of this week......


        Happy Working!

        What will your week be inspired by?

        Saskia XO

        Get Cheeky!

        Brushes Pt 2

        1. Cheekbones (powder blush): Look for natural hair bristles and an angled tip to perfectly sculpt and shape cheekbones. To find where yours are, look in the mirror and suck in your cheeks, then work the brush directly on them using short strokes as you make your way across towards your ears.

        2. Apples (powder blush): Look for natural bristles and a plump body with a pointed tip for the best precision when applying blush to the apples of your cheeks. To find where yours are, look in the mirror and smile; your apples will literally pop out like little golf balls. Swirl the blush in circular motions directly on top of them.

        3. Stippling (cream blush): Look for synthetic bristles in two layers that are different colours, a dark set that is dense and short and a lighter set that is long and sparse. This design picks up two layers when you gently dip it in your cream blush, allowing for different outcomes when swirling it from the apples across your cheekbones (light pressure = sheer finish, heavier pressure = satin finish). Then blend edges with your fingers.

        4. Contouring (cream or powder bronzer): Look for synthetic bristles if you are using a cream bronzer or a cream foundation three shades darker than your skin tone; look for natural bristles if you are using a bronzing powder. Using short strokes, trace the product directly under your cheekbone in the hollows of your cheeks, up to your temples, across your hairline and under your jawline.

        5. Highlighting (loose or pressed highlighting powder): Look for natural bristles in a fan shape that feel light and airy on your skin. This design is perfect for sweeping a shimmery highlighting powder directly above your cheekbones using light, downward strokes. Bonus: Fan brushes were originally developed to “dust” away excess powder or shadow particles, so next time you create a smoky eye and there are little black shadow droppings that have fallen on your cheeks, use your fan brush like a duster to sweep them away.

        6. Bronzing (loose or pressed powder bronzer): Look for natural bristles with a rounded head for the most even application. Unlike using bronzer for contouring, here we’re using it to look sunkissed, so this brush design is ideal to evenly distribute, diffuse and blend the powder as you swirl it all over your face and neck.

        7. Blending (everything!): This Botan Brush by NARS is the only one of its kind out there and a must-have splurge for serious make-up artists. It has short and dense natural bristles that cover almost two inches in diameter and is the ultimate blender to use following blush, bronzer or powder application. Bonus trick: If you use a foundation or bronzer that comes in a spray can, instead of applying it directly to your face, spray it in the palm of your hand, dip the Botan Brush in it then swirl it all over your face and neck for an airbrushed look that is simply gorgeous.

        Hope these top tips help!

        Will you be countering?

        Saskia XO